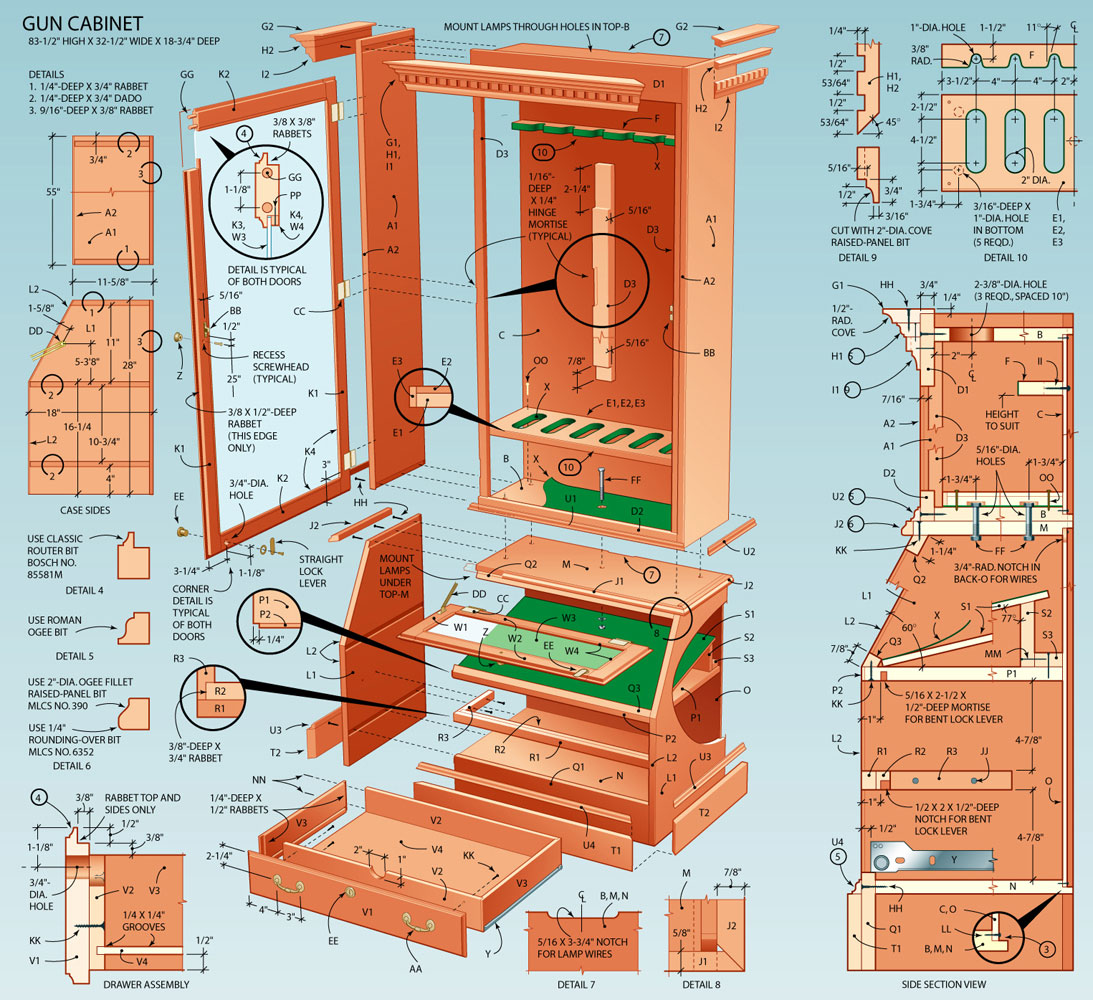
Diy guide to creating a custom wooden gun cabinet for your home

Owning firearms comes with a responsibility to store them securely and responsibly. While commercially available gun safes offer excellent protection, building a custom wooden gun cabinet allows for personalization, aesthetic integration with your home decor, and a sense of pride in crafting a functional and beautiful piece. This guide will walk you through the process of designing, constructing, and finishing a bespoke gun cabinet, ensuring a safe and stylish home for your firearms.
Step 1: Planning and Design
1.1. Determining Your Needs
Before diving into construction, carefully consider your specific requirements:
Firearm Type and Quantity: The size and configuration of your gun cabinet should accommodate all your firearms, including their length, width, and potential accessories.
Storage Needs: Do you need space for ammunition, cleaning supplies, or other accessories?
Style and Aesthetics: Consider your home's décor and choose a style that complements your existing furniture.
Security Features: Decide on the level of security you require. This could include features like reinforced doors, locking mechanisms, and even fireproofing.
1.2. Sketching and Dimensions
Armed with your needs, sketch out your desired gun cabinet design. Consider the following:
Height: Allow ample space for your firearms, especially long guns.
Width: Ensure enough space for multiple rifles or shotguns while maintaining stability.
Depth: Factor in the thickness of the door and the depth of the shelves or drawers.
Interior Layout: Plan for shelves, drawers, and any specific features for storing different types of firearms or accessories.
1.3. Choosing Materials
The choice of materials significantly impacts the durability, aesthetics, and cost of your gun cabinet:
Wood Type: Hardwood like oak, maple, cherry, or walnut offers strength, durability, and beautiful grain patterns. Softer woods like pine or poplar are cheaper but less resistant to scratches and dents.
Plywood: Offers a cost-effective and stable alternative to solid wood, especially for larger cabinets. Look for plywood with a core suitable for your project.
Hardware: Opt for high-quality hinges, locks, and drawer slides. Choose lock types that meet your security requirements.
Finishing: Consider a stain and polyurethane for protection and aesthetics.
Step 2: Construction
2.1. Cutting and Assembling
Cutting: Use accurate measurements and a saw (table saw, circular saw, or jigsaw) to cut the wood according to your design.
Joints: Secure joints are crucial for structural integrity. Consider options like mortise-and-tenon, dowel, or pocket-hole joints.
Assembly: Follow your design plan and assemble the cabinet frame using glue, screws, and wood clamps. Ensure squareness and alignment throughout the process.
2.2. Shelves, Drawers, and Doors
Shelves: Cut and install shelves at the desired height for your firearms.
Drawers: Construct drawers with sides, bottoms, and fronts. Install drawer slides and handles.
Doors: Create the door(s) with solid wood or plywood, incorporating hinges, a locking mechanism, and any desired decorative features.
2.3. Adding Security Features
Reinforcements: For added security, consider reinforcing the cabinet doors with metal plates or thicker wood panels.
Locking Mechanisms: Install high-quality, heavy-duty locks with appropriate keyways and cylinder lengths.
Fireproofing: For extra protection, consider adding fireproofing materials like fire-resistant paint or specialized fireboard panels.
Step 3: Finishing
3.1. Sanding and Finishing
Sanding: Smooth all surfaces with sandpaper in progressively finer grits to remove imperfections and prepare for finishing.
Staining: Apply a wood stain (water-based or oil-based) to achieve your desired color and highlight the wood grain.
Topcoat: Apply a protective topcoat, such as polyurethane or varnish, in multiple thin coats, allowing each coat to dry completely before applying the next.
3.2. Additional Details
Hardware Installation: Attach hinges, handles, drawer pulls, and other decorative hardware.
Interior Finishing: Consider lining shelves with felt or other soft materials to protect firearms.
Step 4: Safety and Storage
Secure Location: Position the gun cabinet in a safe and secure location, preferably out of sight and inaccessible to unauthorized individuals.
Storage Practices: Store firearms unloaded with the action open and in a safe manner. Store ammunition separately.
Maintenance: Regularly inspect the gun cabinet for damage, wear, and tear, and maintain the locks and hardware.
Conclusion
Building a custom wooden gun cabinet is a rewarding project that allows you to personalize your storage solution, integrate it seamlessly with your home décor, and take pride in your craftsmanship. By following this comprehensive guide, you can design, construct, and finish a gun cabinet that is both secure and aesthetically pleasing, ensuring the safe and responsible storage of your firearms. Remember, the most important aspect is to prioritize safety and adhere to responsible firearm handling practices.
0 Response to "Diy guide to creating a custom wooden gun cabinet for your home"
Post a Comment